
After working on my pond control project, I wanted to be able to increase the range of some M5Stack ATOM Lite modules. These modules are ESP32 based and come in a tiny form-factor.

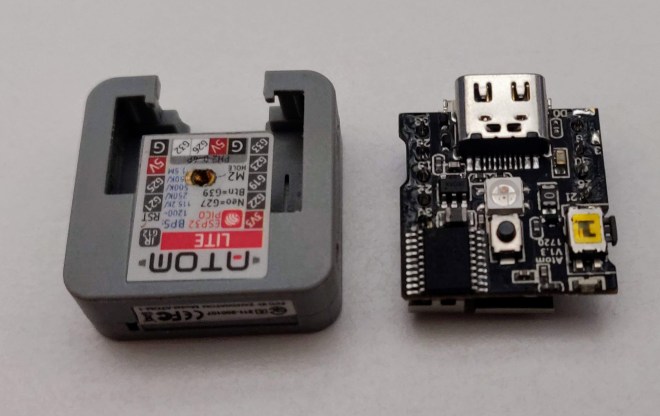
They open easy enough after removing the sticker on the back and then squeezing the clam-shell case. Only 3 parts make up the module – case halves and the PCB inside.
Flipping over the PCB shows the 3D antenna connected to a capacitor-inductor network and the LNA pin on the ESP32-Pico chip.

The sheet-metal antenna is attached at 4 points – one top left, one top right (obscured) and the two bottom right in the foreground. With a little soldering and flux cleanup, the antenna is removed. I used a quick-clamp as a poor-mans PCB holder.


The left-hand pad is the LNA pin, and the right is a ground pad. The two upper pads are not connected to any trace I could find.
The idea is to get the antenna out the side of the case without interfering with the reset button, and also not coming out the bottom or rear (it would prevent the module from being used in the many modules – e.g. the PoE kit). I drilled a small hole in the case.


I cut back the end of a SMA pigtail connector, and tinned the ends.


I threaded the pigtail through the hole, and soldered the centre pin to the left pad, and the outer shield to the right ground pad.


Closing up the unit, I was ready to test


Before starting the internal antenna removal, I ran a simple sketch to list found AP’s. With the internal antenna, a maximum of 8 networks were discovered. With the external antenna, a maximum of 12 networks were found.
This isn’t the most scientific, but gives an idea of the improvement. I also listed the RSSI along with the AP name, and compared the two. The AP I picked was one that I had configured in the garden with 2 walls between.

The red – external – line clearly shows an improvement over the internal antenna.
The final step will be to add a small amount of epoxy to the antenna penetration in the side of the case for mechanical strength. Quick project done.

OK, this is weird– so I’m building a pond monitoring device, as my wife has been having some issues with the water level of our pond in the back yard. The range of the Atom Lite I’m using for the device was lacking a bit, and I’ve cracked it open to look at the antenna. So I search online for m5 atom lite external antenna, and I get your post… and my name is Steve…
I definitely do not feel unique 😀
Which version of Steve are you? What was your manufacture date??
Great post BTW. Thanks!
…god, I think my blue clamp in the Yost knock-off of your blue Irwin clamp in the photos. I’m not kidding!
Ha, even our middle initial is the same, the internet can sometimes seem like a small place. I wonder which of us is the clone? 🤔 Glad my post was helpful 😀
OMG, maybe I’m the knockoff! My shoulders always did pop out of their sockets a little too easily! :-O
Great post! The pictures and description made the process much easier and more certain, too.
One note of caution for others: the two solder pads (the important ones) by the edge are quite delicate. If you’re not careful when desoldering the original antenna, you might pull them from the board (I fortunately had a fried Atom Lite on which to practice). If you’re willing to sacrifice the original antenna, it’s probably safest to use some diagonal wire cutters to gently cut the original antenna just above those pads so that desoldering is easier.
I also made a notch instead of a hole in the case. This allows me to remove the Atom from the case after the antenna is soldered onto the board. I also considered soldering a U.FL connector onto the board so the antenna could be detached, but it doesn’t look like there’s enough space (I’m guessing the OP probably considered this as well and came to the same conclusion).
Using a 135mm antenna, my RSSI went from around a poor -80 or worse connection to a solid -38 connection. Great!
Great points and glad it worked out. Maybe I am the clone after all… 🤖
I was tempted to use a U.FL connector but as you’ve found out, there isn’t enough space and the footprint isn’t quite right.
Great post. Thank you! It will probably solve my problem because I plan to mount my Atom Lites in a metal enclosure. This way I can put the antennas outside of it.